Wednesday, December 30, 2009

Astrea update 2

Some update today:

Took me around 2 Hrs to complete this little stuff.

From 1/144 Astrea


From 1/144 Astrea

Tuesday, December 29, 2009

Astrea update 1

Did some work today, as well as tidied up the workspace it feels like the last time modelling session before school open even though there is still 2 weeks left.

Anyway here are some photos of my progress, the photos are pretty much self explanatory hence I won't do anymore explanation.

From 1/144 Astrea


From 1/144 Astrea


From 1/144 Astrea


From 1/144 Astrea


From 1/144 Astrea


From 1/144 Astrea

The final mini update.

Finished up the mini cooper, all thats left is the photoshoot.

In the meantime here's some sneak preview of the kit taken outdoors with my hp camera

From Mini WIP


From Mini WIP


From Mini WIP


From Mini WIP


From Mini WIP


From Mini WIP

Friday, December 25, 2009

1/144 Astrea

After doing a number of planes and cars, I've finally restarted my gundam engine. This time I'm gonna be doing a long overdue kit, one of the reason why I didn't do it when it was 1st realeased was because I couldn't get my hands on a HG Exia kit.

After a while the Exia R2 kit came out with much better articulation. Hence I decided to use it as a base kit for this conversion.

Box Art:
From 1/144 Astrea


Amount of parts leftover:
From 1/144 Astrea


The parts separation is based on the degenki magazine featuring this kit.
I'll let the pics do the talking

From 1/144 Astrea


Sharpen some parts
From 1/144 Astrea


From 1/144 Astrea


Added detail
From 1/144 Astrea


From 1/144 Astrea


Parts Separation for the head:
From 1/144 Astrea


Overall look:
From 1/144 Astrea

Tuesday, December 15, 2009

MINI affair (Part 4)

Progress has been slow the past few days, wet sanded the body parts and then procced to mask the main body so as to paint the mudguard and side skirts flat black.

Boy, was the process long and painful. This has got to be the biggest masking task I've ever done, I've never used up so much masking tape on one kit alone!

From Mini WIP


And I must say that I totally suck at masking, this is the reason why I stayed away from resin kits.

This time round things look pretty good, no visible bleeding can be seen only slight errors that have been removed by light sanding.

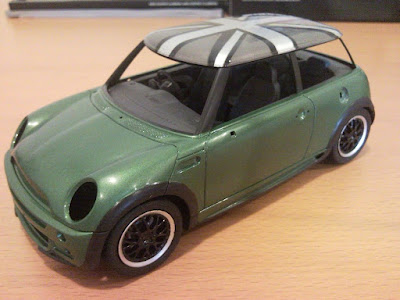
How things look at the moment:
From Mini WIP


It is alomst 80% complete now, I've already painted the clear parts and also futured the windows now waiting for the paint to dry and see how's the results.

All thats left to do is to polish the body and assemble everything.

Friday, December 11, 2009

A MINI affair (Part 3)

Did some work these few days.

Updates:

Chassis (100% complete) glued everything together
From Mini WIP


From Mini WIP


Painted the wheels:
From Mini WIP


3-4 Gloss coats on the body
From Mini WIP


From Mini WIP


Did the window trims, this time no bleeding occured. Still the process is troublesome, this is the part of car building that i dislike most, why can't every kit come with window trims...
From Mini WIP

Gonna try futuring them later and see how it turns out.

Masked and painted a union jack on the roof.
From Mini WIP

Tuesday, December 8, 2009

Mini affair (Part 2)

In commemoration of MINI's 50th birthday and also a special year in Formula 1. I've decided to make this MINI of classic British colours. Hence I present to you:

British Racing Green:
From Mini WIP


Did more work today and here is the progress thus far.
Body (40% complete)
From Mini WIP


From Mini WIP


Not very shiny at the moment.

Chassis (60% complete)
From Mini WIP

This is the first time I painted the underside of the car, wanted to make this kit as perfect as possible.

Interior (100% complete)
From Mini WIP


From Mini WIP


From Mini WIP


From Mini WIP


From Mini WIP

Similarly, I wanted to make the interior more realisitc, hence I spent more effort masking the parts and painting different parts differnt colour. All was going quite smoothly until I flat coated it. While airbrushing the flat coat, I accidentally spilled some onto the kit it self, resulting in the specks on the seat. Futhermore, slight frosting has occured near the floor of the interior. Even though the interior cannot be seen clearly once everything has been put together, I KNOW its there!!

Everything together.
From Mini WIP

Friday, December 4, 2009

A Mini affair

Its been a long time since I updated this blog or started a new project. For this short December holiday, I think i might only be able to complete this model.

The Project: A Mini affair

The Kit: 1/72 Fujimi Mini Cooper Kit.

From Mini WIP


The Contents:
From Mini WIP


Got some reference from the mini dealer:
From Mini WIP


Sanded and test-fitted some parts:
From Mini WIP

The outer body is generally very well done. Only slight flash lines and sink marks. Good fitting of the parts too.

The interior
From Mini WIP


From Mini WIP


Despite the interior being well-fitted, I find that the flaw of this kit is rather the lack of details of the interior. There are no racing bucket seats provided despite the fact that this is the "John Cooper Works version". There are also some inaccuracies in the details which I discovered while comparing with the brochures.
Other than these points I find that its a pretty decent kit to get!

Saturday, October 10, 2009

這樣最好


Nice ad, and nice girl with very nice character. Makes me wonder if such girls still exist in this world.

Instead of asking for a partner who is 知足, would it be better if we were 知足 ourselves first?

Thursday, August 6, 2009

F-14B Completed

After days of rushing, I've managed to complete the F-14B before school re-opens next week. Hastily took some photos with my friend's camera as its battery was running low. Halfway through the photo shoot the camera died on me. I'll probably re-take the photos next time, when I've bought a new camera and when I've done up a base for the F-14B

Currently, this base is taken from the F-15C.

Here are some pics:

From F-14B Completed


From F-14B Completed


From F-14B Completed


From F-14B Completed


From F-14B Completed


From F-14B Completed


From F-14B Completed


From F-14B Completed


From F-14B Completed


For the rest of the pics pls visit : F-14B Completed

I've exprienced some difficulty in applying the decals for this kit. Not too used to these thin decals.

P.S. I'm still unable to access plamo from home. Its very frustrating not able to visit plamo. Without it I find myself suddenly very free and bored at the same time...